Steam Oven Pizza 101

Scott Heimendinger
August 31, 2023
With a little advanced preparation, you’ll be astonished at the quality of pizzas you can make at home in the Anova Precision Oven. Making pizza at home isn’t as easy as ordering from an app, but the results are incomparable!
This pizza dough recipe is my version of Andris Lagsdin’s adaptation of Jim Lahey’s no-knead dough recipe. It couldn’t be easier, but it does take time. You’ll need 72 hours of fermentation in the fridge, then 4 hours of countertop proofing before you’re ready to bake. Greatness is worth the wait.
When it’s time to start baking pizzas, things move fast. So have all your toppings prepped and within reach, and give yourself as much space as you can on your work surface.
Notes: This recipe is designed to use a baking steel, which is now available to purchase from Anova. However, you can substitute a cast iron griddle or a baking stone. If using a stone, bake one rack lower and expect a longer baking time.
Although some pizza recipes will call for using cornmeal to lubricate the pizza peel for transfer to the oven, cornmeal tends to burn when cooked on a baking steel, so I recommend sticking with flour if you’re cooking on a steel.
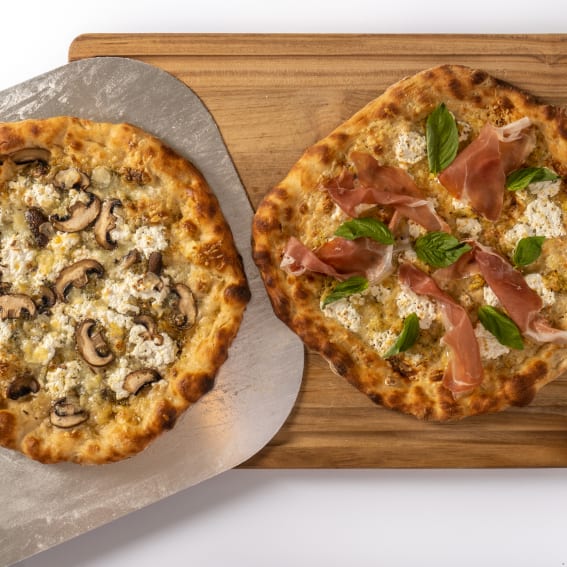
For best results, keep the toppings light and dry. In order for the pizza to bake and crisp, water needs to be driven off. This takes a lot of heat energy. Wet sauces and wet cheeses will eat up that energy and can lead to a soggy or under-baked crust. So, go light on sauce, and use low-moisture cheeses or pat high-moisture cheese very dry with a paper towel before topping.
Serves
4
Prep Time
24:30
Cook Time
00:30
4.93 (16)
25087
Ingredients
500 g (3 ½ cups)
bread flour, plus more for shaping and the peel
5 g (1 ½ tsp)
kosher salt
1 g (about ¼ tsp)
active dry yeast
340 g (1 ¼ cups plus 3 Tbsp)
filtered water
10 g (2 tsp)
soy sauce
Pizza sauce, cheese, and toppings of your choice (see note)
Extra-virgin olive oil, for brushing
Steps
1. Combine Dry Ingredients
In a large bowl, whisk together the flour, salt, and yeast.

2. Add Wet Ingredients
Add the water and soy sauce and mix with a wooden or silicone spoon until the dough comes together to form a ball.

3. Lightly Knead
Transfer the dough ball to a floured work surface. Knead until the dough is no longer lumpy, but still looks a little uneven and slightly shaggy, 2 to 3 minutes.
4. Refrigerate
Transfer to an airtight container or plastic-wrapped bowl (with plenty of extra room for the dough to expand) and refrigerate at least 24 hours. I find the dough is ideal after about 72 hours of refrigeration, but it can remain in the fridge for up to 7 days before use.

5. Transfer to Work Surface
Remove the dough from the refrigerator and transfer to a well-floured work surface. It should appear wet and bubbly.
6. Form into Ball
Working gently, form the dough into a ball, dusting with additional flour as needed. Try not to overwork the dough, as this can knock out the air bubbles it has developed during bulk fermentation.
7. Portion Dough
Divide into 4 equal portions.
8. Form Rounds
Working as gently as you can and adding flour as needed, work each portion of dough into a spherical shape with a taught membrane of dough over the top edge. If necessary, pinch together the corners on the underside of the dough to help create a tight surface across the top.
9. Oil and Cover
Oil the bottom of 4 small containers, then add the dough and brush oil over the top. Cover tightly with a lid or plastic wrap.
Sixteen-ounce takeout deli containers work great for this purpose, as they help the dough retain a circular shape during the next stage of proofing. You can also use small, individual bowls, or oil the balls well and proof on the countertop covered in plastic wrap, leaving plenty of space between.
10. Bench Rise
Let the dough rise at room temperature until doubled in size, about 4 hours.
11. Turn on Oven
Rack
At least 45 minutes before baking, place a baking steel (see note) on an oven rack in the second-highest position. Turn the oven on and begin preheating.
Sous Vide Mode: Off
Steam: Off
Temp: 482°F
Heat: Rear
12. Preheat Steel
Rack
Continue to heat for 45 minutes after the oven has reached its target temperature. This extended preheat time will ensure that the steel is fully heated for baking.
Sous Vide Mode: Off
Steam: Off
Temp: 482°F
Heat: Rear
00:45 Timer
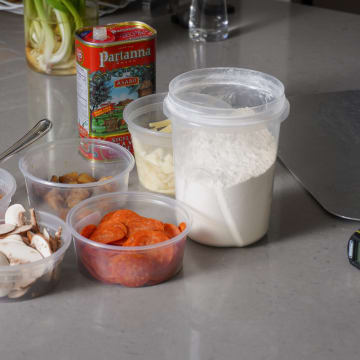
13. Prepare Toppings
Meanwhile, prepare pizza sauce, cheese, and toppings. If you’re making multiple pizzas, you’ll want to move quickly from one to the next, so having everything you need prepped, ready, and within reach will help you streamline the pizza assembly.
14. Remove One Dough Ball
Liberally dust the counter with flour and decant one dough ball from its proofing container. Dust both sides in flour to prevent sticking. At this point, the dough has some inherent shape already, and you want to work with, not against, that shape.
15. Stretch and Shape Dough
To work the dough into a thin, circular crust, use a combination of stretching on the work surface and expanding on the back sides of your hands.
Make loose fists with both hands and lay the dough over your fingers and knuckles. Very gently spread your hands apart from one another to stretch the dough into a larger circle being careful that the dough never gets thin enough to tear.
Place the dough upside-down on the work surface to add more flour. Gently grab the edges to tug the dough into a circular shape. Repeat this process until the dough is 12 inches in diameter and acceptably circular.
16. Transfer to Peel
Very liberally flour a pizza peel (see note). Transfer the crust to the peel and reshape it back into a circle as necessary. Give the peel a few good shakes to confirm that the dough isn’t sticking before topping the pizza.
17. Oil Edges
Brush olive oil onto the edges of the crust, taking care not to let oil drip down onto the peel, as this can cause the dough to stick. Oiling the outer crust will encourage browning when the pizza bakes.
18. Top Pizza
Add toppings (see note).
19. Shake Peel
Give the pizza peel one last, good shake to make sure the pizza isn’t sticking anywhere. It should float like an air hockey puck. If there are any signs of sticking, use a long spatula to work some additional flour between the dough and the peel and repeat the shake test again.
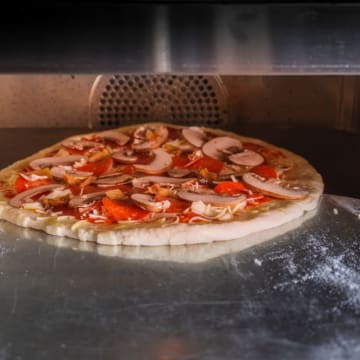
20. Transfer to Oven and Bake
Rack
Launch the pizza directly onto the baking steel. This can take some practice to build confidence, but the movement goes as follows: Line up the far edge of the peel close to the back edge of the baking steel and hold the peel at a slight downward angle. Shake front-to-back in small motions to encourage the far edge of the dough onto the steel. Continue shaking while pulling the peel away from the oven until the entire pizza is sitting on the steel. Close the oven door immediately.
Bake until the crust is puffy and golden and the cheese has developed browned spots, 5 to 7 minutes. Use the peel to rotate the pizza 180 degrees halfway through baking to ensure even browning. Keep a close eye on the pizza, especially towards the end, as browning happens fast.
Sous Vide Mode: Off
Steam: Off
Temp: 482°F
Heat: Rear
00:07 Timer
21. Begin Shaping Next Pizza
If making additional pizzas, begin shaping the next pizza while the first bakes. Don’t transfer to the peel until the first pizza is finished.
22. Cool on Wire Rack
Use the peel to remove the pizza from the oven. Transfer to a wire cooling rack and let cool for 3 to 4 minutes before serving.
Cooling on a wire rack will allow steam from the crust to escape, producing a crisp crust. If you transfer the pizza directly from the oven to a solid surface, like a cutting board, that steam will make the crust soggy instead.

23. Repeat
Repeat with the remaining dough. Each pizza will pull energy out of the baking steel, so ensure that you open and close the oven door only as much as needed when baking.
24. Slice and Serve
Enjoy! You’ve earned it.

© 2013 - 2026 Anova Applied Electronics, Inc.