Roast Chicken 101

Scott Heimendinger
October 15, 2021
When you roast a whole chicken in the Anova Precision Oven, you’ll enjoy crispy skin and flavorful, juicy meat with no worry of over- or under-cooking. This low and slow recipe uses a dry brine and steamless sous vide cooking to hold onto precious chicken juices during cooking while keeping the skin from turning soggy. Then the powerful convection fan evenly browns the skin quickly without drying out the interior.
Notes: You can use whole chickens of any size for this recipe; the total cooking time will change, but you do not need to modify any settings.
This recipe calls for an overnight rest in the refrigerator after seasoning. This process, often called dry brining, helps to both season the bird and to dry out the skin. If you skip this step, you likely won’t be able to achieve fully crisp skin.
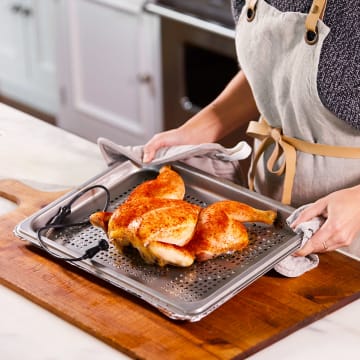
This recipe works best when there’s some airflow underneath the chicken. The photos in this recipe show a perforated pan, which is now available to order through Anova. If you don't have one, placing a wire rack over a sheet pan works as a substitute.
Using the settings below, a small chicken will gently glide into perfect doneness in a little more than 2 hours, but without any risk of overcooking. If you prefer to speed up cooking, you can increase the oven temperature to 163°F (73°C), which will reduce the cooking time to around 1 hour, depending on the size of the bird. In either case, remove the chicken when the probe reaches its target.
This recipe produces chicken with very juicy meat. For a more traditional texture, increase the probe temperature to 155°F (68°C) and the oven temperature to 160°F (71°C). No matter your target temperature, you can keep the chicken warm for up to 3 hours before searing by dropping the oven temperature to 142°F (61°C).
The oven may get smoky during the searing stage from drippings pyrolyzing, and that’s okay—it’s adding flavor back to the bird.
Serves
4
Prep Time
24:10
Cook Time
02:10

4.38 (39)
29986
Ingredients
1 small whole
chicken
Kosher salt
2 tsp
granulated garlic or garlic powder
2 tsp
smoked paprika
Neutral oil, such as grapeseed
Steps
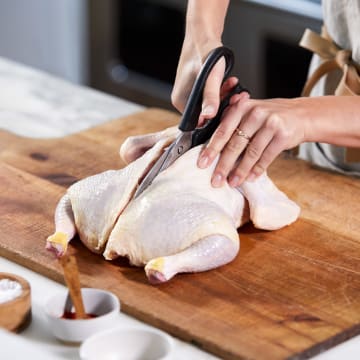
1. Remove the Backbone
Place the bird onto its breast on a cutting board and use a pair of heavy duty kitchen shears to cut along either side of the backbone, removing it completely. (Reserve the backbone for making stock.)
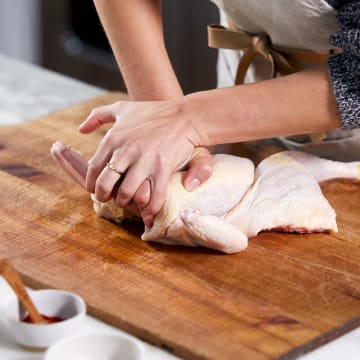
2. Spatchcock the Chicken
Flip the chicken so that it is breast-side up. Press down firmly on the top of the breast to crack the breastbone, allowing the bird to lay flat. Tuck the wingtips in on themselves. Using paper towels, pat the bird dry as dry as possible, especially on the skin.
3. Season
Place the chicken on a rimmed sheet pan. Season the chicken on all sides liberally with salt. Arrange the chicken skin-side up and sprinkle the skin with the granulated garlic and paprika.

4. Refrigerate Overnight
Refrigerate the seasoned chicken, uncovered, for at least 12 or up to 24 hours to dry out the skin (see note).

5. Preheat the Oven
Rack
Sous Vide Mode: On
Steam: Off
Temp: 149°F
Heat: Rear
6. Prepare Pans
Line a rimmed sheet pan with foil to catch drippings. Brush a perforated pan with some of the neutral oil (see note).

7. Insert Probe
Transfer the chicken to the pan, skin-side-up. Spread the legs out so that they are not underneath the breast cavity and the chicken lays completely flat.
Lift the skin from the top of the chicken to reveal the breast meat. Insert the probe into the thickest part of the breast, taking care to avoid the breastbone and to not pierce the skin.

8. Transfer to the Oven and Cook
Rack
Place the foil-covered sheet pan on the lowest rack position. Place the perforated pan with the chicken on the middle rack position with the legs facing the back of the oven. Connect the probe and cook until the probe reaches its target temperature, at least 2 hours (see note).

Sous Vide Mode: On
Steam: Off
Temp: 149°F
Heat: Rear
145.4°F Probe Target
9. Remove from Oven
Remove both the chicken tray and drip tray from the oven. Remove the probe from the chicken. Removing the chicken before adjusting the oven for searing ensures that the meat doesn't overcook before the oven is hot enough to crisp the skin.
10. Adjust the Oven for Searing
Rack
Sous Vide Mode: Off
Steam: Off
Temp: 482°F
Heat: Rear, Top
11. Brush with Oil
While the oven is preheating, brush or spray the chicken’s skin with oil. This will help the skin crisp and brown evenly.

12. Return to Oven and Sear
Rack
When the oven has reached temperature, add the drip tray back to the bottom rack and place the chicken and perforated tray on the middle rack with the legs facing the back of the oven. Roast until the chicken skin is golden brown and crisp, 5 to 10 minutes. Keep a close eye on the chicken—the skin can go from perfectly golden to burnt in a short time (see note).
Sous Vide Mode: Off
Steam: Off
Temp: 482°F
Heat: Rear, Top
00:10 Timer
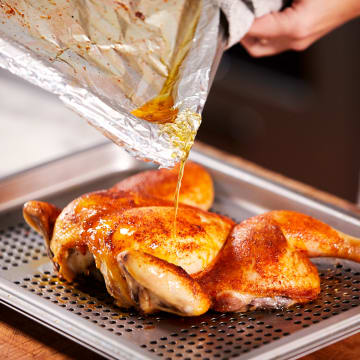
13. Pour Drippings Over Chicken
Carefully remove both pans from the oven. Place the chicken pan on a second rimmed sheet pan, then carefully pour the hot drippings over the top of the chicken to help crisp and season the skin.
14. Rest, Carve, and Serve
Transfer the chicken to a cutting board and rest for 10 minutes. To carve, separate the legs from the breast, and then remove the breast meat from the bone. Slice the breast meat into thin pieces. Serve with your favorite side dishes.

© 2013 - 2026 Anova Applied Electronics, Inc.