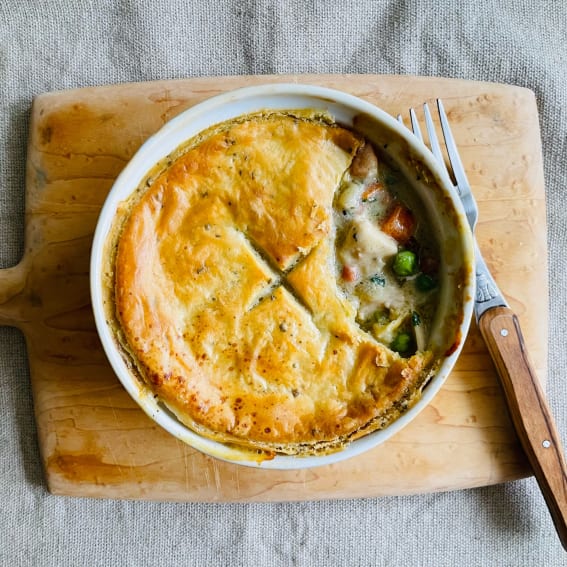
Chicken Pot Pie

Ali Clarke and Santos Loo
December 14, 2022
Chicken pot pie is a go-to recipe for our family, especially in the fall and winter. Using the Anova Precision Oven to cook the chicken sous vide ensures that it is perfectly cooked before being added to the filling, for moist and tender bites. The creamy and slightly tangy filling is topped with our homemade herb-filled dough for a flavorful, flaky crust.
Notes: The chicken can be cooked 1 to 2 days in advance, cooled, and stored in the fridge with any juices from the pan.
The dough can be made 3 to 4 days in advance and refrigerated or frozen for up to 6 months. Any extra dough can be used to decorate the top of the pot pies, or can be cut into rounds and stored in a zip top bag in the fridge or freezer to make more pot pie. If you need to stack the rounds, place a piece of parchment paper between the layers.
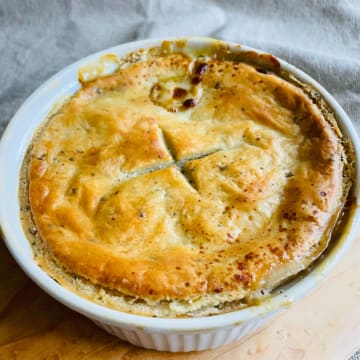
We like serving these in individual ramekins but you can also use ovenproof bowls.
Half and half can be substituted in this recipe by mixing together equal parts heavy cream and whole milk.
This recipe uses Diamond Crystal kosher salt.
Serves
4
Prep Time
01:15
Cook Time
01:15
4.75 (4)
932
Ingredients
For the Dough
2 cups (240g)
all-purpose flour, plus more for rolling
1 tsp
kosher salt
12 Tbsp
cold, unsalted butter, cut into quarters lengthwise and then into ¼-inch cubes
2 Tbsp
roughly chopped fresh sage or thyme
¼ cup
cold water, plus up to 1 tbsp more if needed
2 Tbsp
half and half, for brushing on the pies
For the Chicken Pot Pie
¼ cup
extra-virgin olive oil, divided
1.5 lb (680g)
boneless skinless chicken breasts (2 to 3 breasts, depending on size)
3 tsp
kosher salt, divided
1 tsp
freshly ground black pepper, divided
4 oz (112g)
pancetta, cut into ¼-inch dice
1 medium
yellow onion, cut into ¼-inch dice (about 1 cup or 136g diced)
2 medium
carrots, peeled and cut into ¼-inch dice (about ¾ cup or 88g diced)
2 stalks
celery, ends trimmed and cut into ¼-inch dice (about ¾ cup or 88g diced)
4 cloves
garlic, minced
1 Tbsp
roughly chopped fresh sage or thyme
4 Tbsp
unsalted butter
¼ cup (35g)
all-purpose flour
½ cup
dry white wine
2 cups
low-sodium chicken stock
1 cup
half and half
½ cup (58g)
frozen peas, thawed
¼ cup
roughly chopped fresh parsley
2 Tbsp
fresh lemon juice
Steps
1. Make the Dough
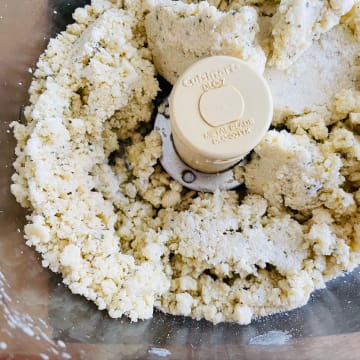
Add the flour and salt to the bowl of a food processor and pulse 1 to 2 times to combine. Break the butter up evenly as you add it over the flour. Pulse again 10 to 12 times or until the butter and flour are evenly combined and the butter is about the size of small peas. Add the sage to the food processor.
With the motor running, slowly stream in the water until the dough just begins to come together and the sage is evenly combined; the dough will still have a slightly shaggy texture and won’t completely form a ball but will hold together when pinched. If the dough is still dry, add 1 teaspoon of additional water at a time until it comes together.
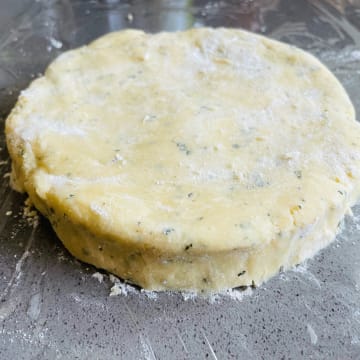
2. Form the Dough
Lay a sheet of plastic wrap onto a clean work surface and turn the dough out onto the plastic. Use your hands to bring the dough together into a mound and then flatten it into a 1-inch-thick round. Wrap completely in the plastic wrap and refrigerate for at least 1 hour, or until the dough is rested and firm.
3. Preheat the Oven
Rack
Place one oven rack in position 2.
Sous Vide Mode: On
Steam: Off
Temp: 165°F
Heat: Rear
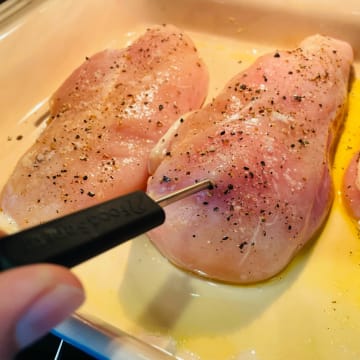
4. Prepare the Chicken
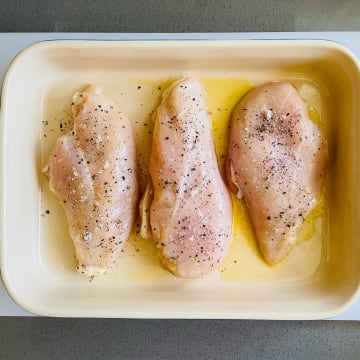
Add 2 tablespoons of the olive oil to a baking dish or sheet pan. Add the chicken breasts and turn to coat all over in the oil. Season both sides with 1 teaspoon of the salt and ½ teaspoon of the pepper.
5. Sous Vide the Chicken
Rack
Place the probe in the thickest part of the largest chicken breast. Place in the oven and bake until the probe reaches its target temperature, 45 to 50 minutes.
When cooked, remove the chicken from the oven and set aside to rest and cool. Reserve any liquid from cooking the chicken in a small bowl.
Sous Vide Mode: On
Steam: Off
Temp: 165°F
Heat: Rear
160°F Probe Target
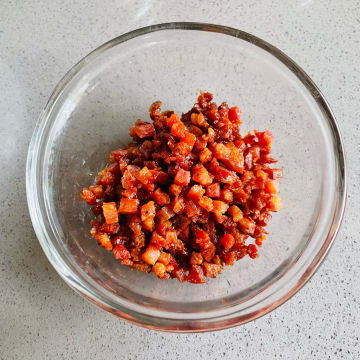
6. Cook the Pancetta
In a high-sided sauté pan over medium-low heat add the remaining 2 tablespoons of olive oil and the pancetta; the oil and pancetta will heat up together. Cook the pancetta, stirring occasionally, until the fat has rendered and the pancetta is deeply caramelized and crispy all over, 8 to 10 minutes.
Remove the pan from the heat and use a slotted spoon to remove the pancetta to a paper towel-lined plate, leaving behind the remaining rendered fat and oil in the pan.
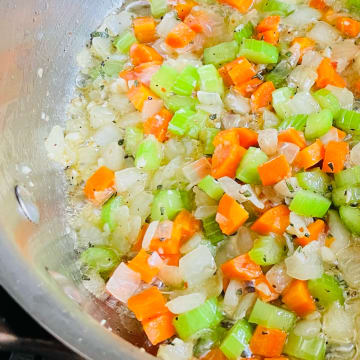
7. Sauté the Vegetables
Place the pan back on the stove over medium heat. Add the onion, carrot, celery, garlic, sage, 2 teaspoons salt, and ½ teaspoon black pepper. Sauté for about 8 minutes, stirring occasionally, or until the vegetables have softened and the onion is translucent but not yet browned.
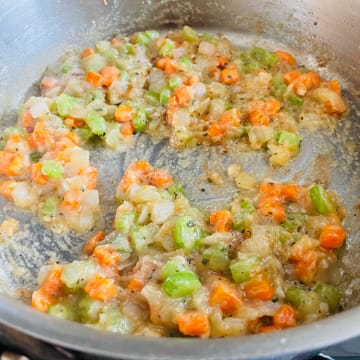
8. Make the Roux
Add the butter to the vegetables and let melt, stirring to combine. Stir in the flour until it evenly coats the vegetables and has been completely absorbed by the butter. Continue to cook for 3 minutes, stirring frequently, until the roux is a pale golden color.
9. Make the Filling
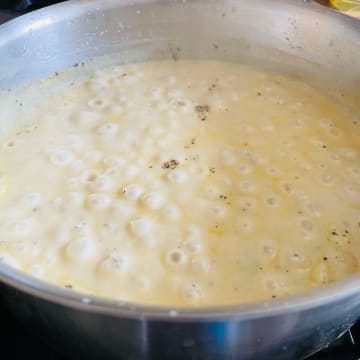
Deglaze the pan with the wine, scraping the bottom of the pan to release any brown bits. Cook for about 1 minute, or until the wine just begins to simmer. Whisk in the chicken stock, half and half, and any reserved liquids from cooking the chicken, making sure to evenly incorporate the liquids with the roux.
Bring the mixture to a simmer over medium-low heat and continue to simmer for 6 to 8 minutes or until the sauce thickens and coats the back of a spoon. Taste the sauce and adjust with more salt and pepper to taste if needed. Remove from the heat.
10. Finish the Filling
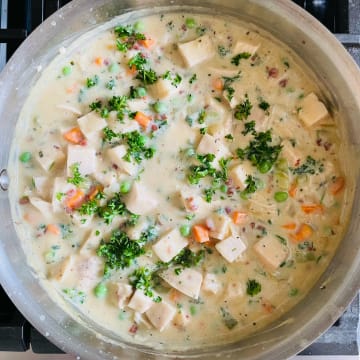
Cut the cooled chicken into ½-inch pieces. Stir the diced chicken, pancetta, peas, parsley, and lemon juice into the filling. Set aside and let the filling cool slightly while you roll out the dough.
11. Roll Out the Dough
Remove the dough from the refrigerator and let sit for about 10 minutes to soften slightly.
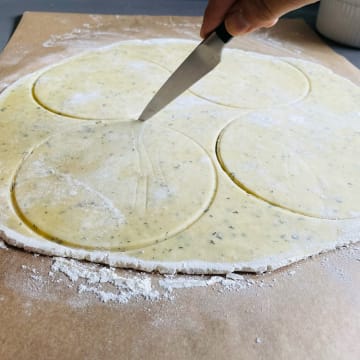
Lightly dust a clean work surface with flour. Lightly dust the top of the dough and roll the dough into a 13- to 14-inch round that is about an ⅛-inch-thick, rotating the dough as needed to ensure even thickness. Continue to lightly dust the top and bottom of the dough as needed so that it doesn’t stick.
Invert a 16-ounce ramekin (about 5 inches in diameter and 2 inches deep) or oven-proof bowl onto a corner of the dough and lightly press it into the dough to leave an outline of the ramekin. Repeat this so that you have the impression of four rounds. Remove the ramekin and use a paring knife to cut the rounds out of the dough. If necessary, you can re-roll the dough scraps to get all the crusts cut. Save any leftover dough to add decorations on top or for another use.
12. Assemble Pot Pies
Divide the filling evenly between four 16-ounce ramekins or ovenproof bowls. Place one dough round on top of each ramekin. Let the edge of the dough come up the inside edge of the ramekin slightly and use your fingers to gently press the dough into the ramekin edge to adhere.
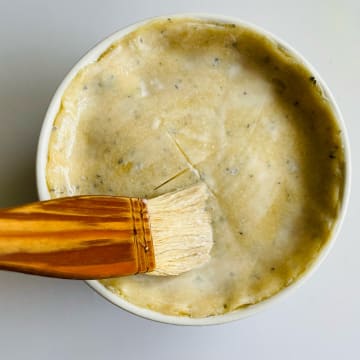
Cut two slits into the top of the dough in the center in the shape of an X. Repeat with the remaining three ramekins. Brush the tops of the dough with the 2 tablespoons half and half and place on a baking sheet.
13. Adjust the Oven Temperature
Rack
Sous Vide Mode: Off
Steam: Off
Temp: 375°F
Heat: Top, Bottom
14. Bake the Pot Pies
Rack
Place the pot pies in the preheated oven and bake until the crust is golden brown and the filling just begins to bubble through the slits, 18 to 22 minutes. Remove from the oven and let cool slightly before serving.
Sous Vide Mode: Off
Steam: Off
Temp: 375°F
Heat: Top, Bottom
00:18 Timer
© 2013 - 2026 Anova Applied Electronics, Inc.